Everyone with a coach has a love/hate relationship with progress pics. They can be a great reminder of how far you’ve come, forcing you to see yourself as the camera captures you. They can also be a pain in the ass and a frustrating “raw” view of a body you are trying hard to move away from.
The psychology of progress pics deserves a book of its own and is beyond the scope of this post. Suffice to say, my thoughts can be summed up like this: “love your body in its current state while also realizing it’s ok to want to change it.”
The logistics of progress pics can easily be overcome – DO NOT rely on outside help, it makes this a pain in the ass for two people instead of one, and invariably you will be late because your help is unavailable. I can guarantee you that your coach does not want this to happen. Invest in a tripod like this and a phone mount/bluetooth clicker like this and you are well on your way to photographic independence.
NOW – why are we doing this and why do we care? Obviously, your progress pictures show your progress (duh, thanks for the insight Darin). But they show it in numerous ways – when I look at someone’s pics, I’m not just comparing them to those from previous weeks, I’m also just looking and asking “does this person understand their body?” Body awareness is huge – I would go so far as to say that in bodybuilding, if you lack body awareness you aren’t really bodybuilding. I define body awareness as the ability to manipulate your body and create tension in a muscle group without applying resistance to a muscle – this basically means being able to flex a muscle – any muscle – isometrically, in virtually any position. Easy for some, tricky for others. This also is not a binary thing – not a “yes I can do that” or a “no I can’t do that” situation – there are degrees. You can flex your quads while standing, great – but can you isolate the vastus lateralus (outer head) versus the medius? How hard can you squeeze it? These things matter.
So it goes without saying that a progress pic where the subject is relaxed is worthless. If the camera can see it, it needs to be tensed/flexed. This means in a front pose, you have tension in your quads, abs, chest, shoulders, arms, and lats – that a lot to keep your mind on all at the same time. It takes practice.
For competitors, the reason we do this is obvious – your posing is how you present yourself on stage and has a massive impact on how you are judged. If you don’t practice your posing and your overall stage presentation regularly (that applies to men AND women), you are leaving out a huge and critical component of your prep.
For non-competitors, it’s all about gauging and developing that body awareness. I would say if you can’t properly engage your lats in a photo (exceedingly common), you probably aren’t engaging them during an exercise where you’re trying to make them do the work. Again, not a binary thing – you’re probably engaging them some, but not as much as we would like. Learning how to pose correctly is the basis of learning how to lift correctly. Focus on creating tension in the muscle, first without weight – then hit the gym, apply some resistance, and utilize your new-found tension-making skills to actually perform the exercise.
With that said, let’s get down to business and look at the main three poses we want to work on. With all of these there is the possibility of
some variation – mostly concerning competitors who want to show off their physique in the best possible way. You may want to try a different stance, position your arms a bit differently, etc – that’s fine. This is intended to provide a good starting point.
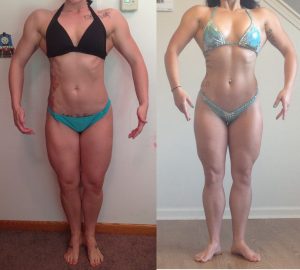
Front
 Focal points: quads, abs, chest, shoulders, biceps, forearms, lats
How to: position your heels 2-3″ apart and angle your toes outward. Bend the knees SLIGHTLY to make it easier to apply tension in the quads. Suck in the stomach, expand the ribcage, raise the sternum, and bring the shoulders forward slightly to cue the lats. Imagine a giant rubber band running between your elbows you are trying to pull apart to help create tension in the delts. Smile.
Goal: show separation in the quads, make the waist as small as possible, show v-taper from the waist up through the lats, makes the shoulders as wide as possible.
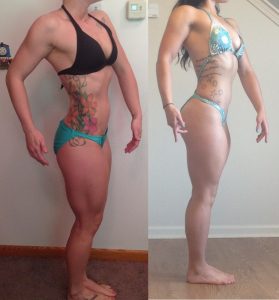
Notice in the photos here they are not identical but the broad strokes are the same – create the shape first, develop the tension, and fine tune.
Side
 Focal points: quad (one), hamstring (same leg), glute (same side), obliques, chest, shoulder, tricep, bicep
How to: turn 90 degrees to the right from the front position. Place your feet together, with the arch of your front (camera-facing) foot resting against the ball of your other foot (front facing foot just slightly ahead). Tense the quad, hamstring, and glute on the camera-facing side, along with the oblique. Stretch yourself vertically, arching the lower back and raising the sternum. Rotate slightly at the shoulders so the camera can see the back shoulder as well as the separation between the chest. Tense those along with the arms. Allow some daylight to be seen between the torso and both arms, but don’t bring them way away from your body. Smile.
Goal: show shape and definition in the leg and glute, showcase a small waist and that everything swells up around the chest/shoulder area.
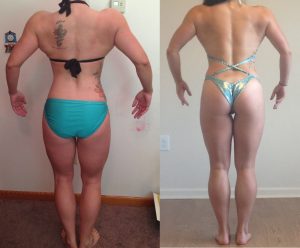
Back
 Focal points: calves, hamstrings, glutes, lower back, lats, traps, shoulders, triceps
How to: the foot positioning is the same as the front pose, heels together and toes apart. Tense the calves and hamstrings (this is hard and takes practice) and the glutes (act like you really have to poop and you’re holding it in), arch the lower back in an attempt to engage the spinal erectors at the base. Push the shoulders forward (stretch the traps) and raise the sternum to help engage the lats, then pull the shoulders back SLIGHTLY to engage the traps. Create tension in the triceps while keeping the elbow slightly bent. Smile. Or don’t, the camera can’t see it.
Goal: show those calves finally along with hamstring and glute detail. Tiny waist, WIDE back and shoulders.

